
Table of Contents
Have you ever looked at those beautiful lemon meringue tarts in bakery windows with their tall, golden peaks and wondered if you could ever make something that fancy at home? What if I told you that this showstopping dessert is actually much easier than it looks? A lemon meringue tart is like sunshine on a plate – tangy lemon filling, sweet fluffy meringue, and buttery crust all in one amazing bite. But here’s the secret that bakeries don’t want you to know: you don’t need fancy tools or years of training to make a perfect lemon meringue tart. With just a few simple ingredients and some easy tricks, you can create a dessert that looks like it came from a French patisserie. Ready to discover how surprisingly simple it is to make this elegant treat?
What Makes This Lemon Meringue Tart So Special?
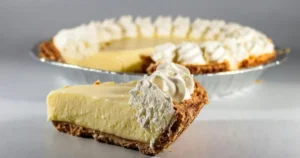
A lemon meringue tart is special because it has three amazing layers that work together perfectly. The crispy, buttery crust is like a cookie. The lemon filling is smooth, tangy, and sweet at the same time. The meringue topping is light as a cloud with golden, toasted peaks. This dessert looks fancy enough to serve at a wedding but tastes like a happy summer day!
Time Needed: About 2 hours total (including chilling time)
- Prep time: 30 minutes
- Baking time: 45 minutes
- Cooling and assembly: 30 minutes
- Chilling time: 15 minutes
Difficulty Level: Medium Don’t let the fancy look scare you! If you can stir, whisk, and use an oven, you can make this tart. The steps are simple, and I’ll show you all the tricks to make it perfect.
Essential Ingredients: What You’ll Need
Here’s everything you need to make your beautiful lemon meringue tart:
For the Tart Crust:
- 1¼ cups all-purpose flour
- ½ cup cold butter, cut into small pieces
- ¼ cup powdered sugar
- 1 egg yolk
- 2 tablespoons cold water
- Pinch of salt
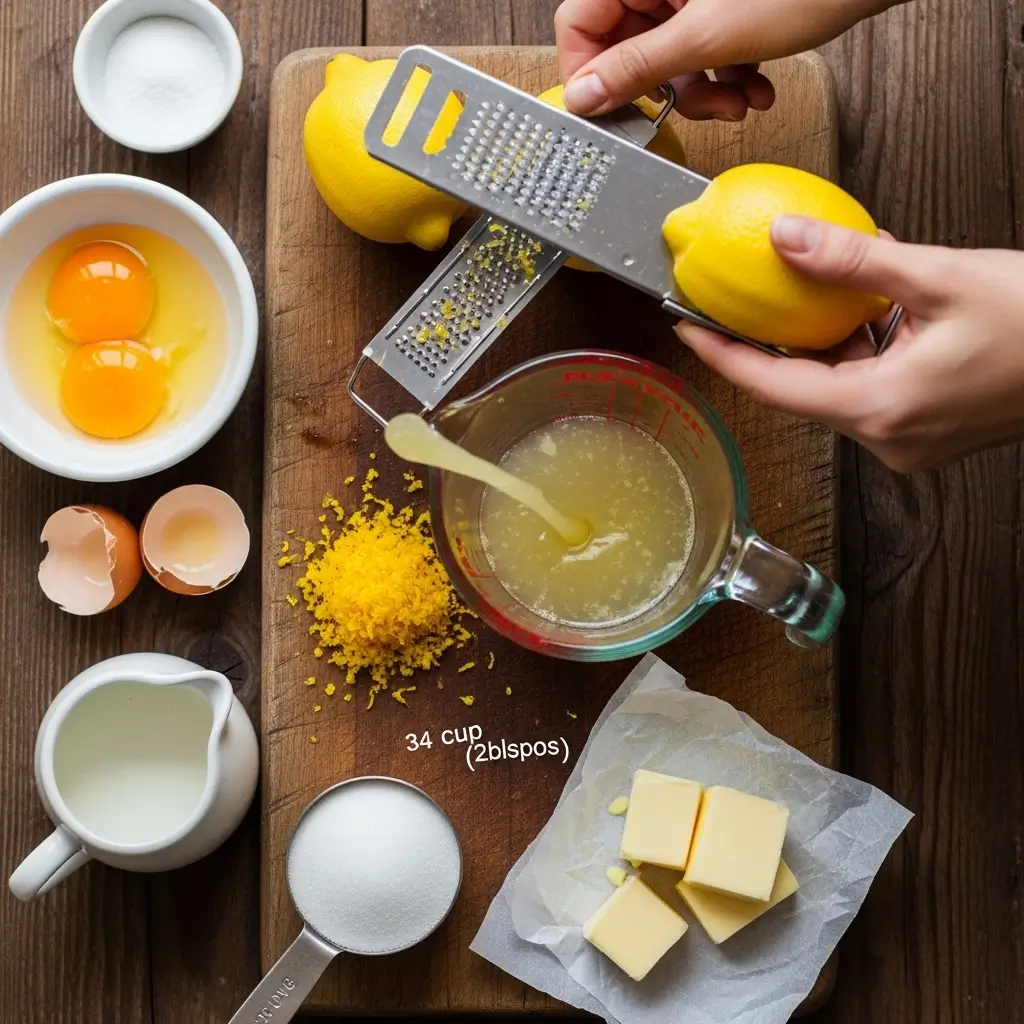
For the Lemon Filling:
- 4 large lemons (you need ¾ cup fresh lemon juice and 2 tablespoons zest)
- 1 cup granulated sugar
- 4 large eggs
- 3 egg yolks (save the whites for meringue!)
- ½ cup heavy cream
- ¼ cup butter, cut into pieces
For the Meringue:
- 4 egg whites (from the eggs you used above)
- ¾ cup granulated sugar
- ¼ teaspoon cream of tartar
- ½ teaspoon vanilla extract
Why Each Ingredient Matters:
Fresh lemons are the star! Always use fresh lemon juice, never the bottled stuff. Fresh lemons make the filling bright, tangy, and amazing.
Butter appears in both the crust and filling. It makes everything rich and delicious. Cold butter in the crust makes it flaky, and room-temperature butter in the filling makes it smooth.
Eggs do three jobs! The yolk makes the crust tender, whole eggs thicken the lemon filling, and egg whites create that fluffy meringue cloud.
Cream of tartar is a secret weapon for meringue. It helps the egg whites get fluffy and stay fluffy without getting watery.
Powdered sugar in the crust makes it tender and cookie-like, while regular sugar in the filling and meringue adds sweetness.
Smart Substitutions:
- No cream of tartar? Use ½ teaspoon lemon juice or white vinegar instead
- Can’t find powdered sugar for crust? Blend regular sugar in a blender until fine
- Want to use store-bought crust? Go for it! Use a 9-inch tart shell
- No heavy cream? Whole milk works but won’t be quite as rich
- Prefer lime? Use limes instead of lemons for a lime meringue tart
Step-by-Step Instructions: Let’s Make Magic!
Step 1: Make the Perfect Tart Crust
- Mix flour, powdered sugar, and salt in a big bowl
- Add cold butter pieces and use your fingers to rub them into the flour (it should look like wet sand)
- Mix egg yolk with cold water, then stir into the flour mixture
- Form into a ball, wrap in plastic, and chill for 30 minutes
- Roll out the dough on a floured surface to about ¼ inch thick
- Press gently into a 9-inch tart pan with removable bottom
- Trim the edges and prick the bottom with a fork
- Chill for 15 minutes
Pro Tip: Keep everything cold! Cold butter makes flaky crust.
Step 2: Blind Bake Your Crust
- Preheat oven to 350°F
- Line the crust with parchment paper
- Fill with pie weights, dried beans, or rice
- Bake for 20 minutes
- Remove weights and paper
- Bake for another 10 minutes until golden
- Let it cool while you make the filling
Baking Tip: The weights stop the crust from puffing up and keep it flat and pretty!
Step 3: Create the Lemon Filling
- Zest your lemons first, then juice them (you need ¾ cup juice)
- In a medium saucepan, whisk together sugar, eggs, and egg yolks
- Add lemon juice, lemon zest, and cream
- Cook over medium heat, stirring constantly with a whisk
- Keep stirring for about 8-10 minutes until it gets thick like pudding
- When it coats the back of a spoon, it’s ready
- Remove from heat and stir in butter pieces until melted
- Strain through a fine sieve to remove any lumps
- Pour into your baked tart shell while still warm
Cooking Secret: Never stop stirring! This keeps the eggs from scrambling and makes it super smooth.
Step 4: Make the Fluffy Meringue
- Make sure your bowl and beaters are completely clean and dry
- Beat egg whites and cream of tartar on medium speed until foamy
- Slowly add sugar, one tablespoon at a time
- Keep beating until the mixture forms stiff, glossy peaks (about 5 minutes)
- Add vanilla and beat for 30 more seconds
- The meringue should be shiny and hold its shape when you lift the beater
Meringue Magic: The peaks should stand straight up without drooping. That’s perfect!
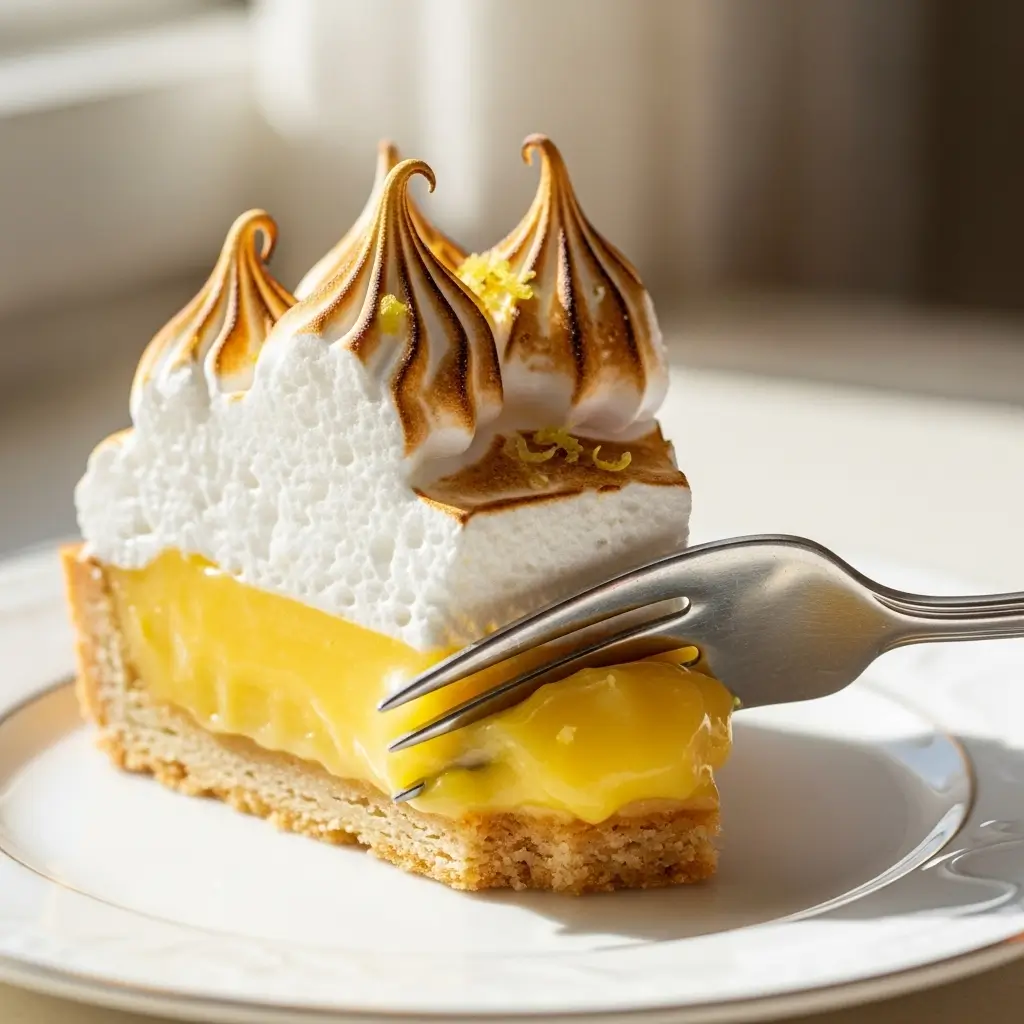
Step 5: Top and Toast Your Tart
- Spoon meringue over the lemon filling while it’s still warm
- Spread it all the way to the edges (this seals it and prevents weeping)
- Use a spoon or spatula to make pretty peaks and swirls
- Toast with a kitchen torch until golden brown, OR
- Bake in a 400°F oven for 5-7 minutes until peaks are golden
- Let cool to room temperature
- Chill in the fridge for at least 2 hours before serving
Building Your Beautiful Lemon Meringue Tart
Think of making this tart like building a house. The crust is your foundation – it needs to be strong and crispy. The lemon filling is the main floor – smooth and perfectly level. The meringue is the roof – fluffy, tall, and beautiful!
Assembly Tips:
- Always pour hot lemon filling into a completely cooled crust
- Add meringue while the filling is still slightly warm – this helps them stick together
- Spread meringue all the way to the crust edges to seal it
- Make sure there are no gaps between meringue and filling
Presentation Ideas:
- Use the back of a spoon to create dramatic peaks
- Pipe meringue with a piping bag for professional swirls
- Dust with powdered sugar before serving
- Garnish with thin lemon slices and fresh mint
- Serve on a pretty cake stand or white plate
- Add candied lemon peel for extra elegance
Slicing Tips:
- Use a sharp knife dipped in hot water
- Wipe the knife clean between each slice
- Cut slowly and confidently
- A serrated knife can help cut through the meringue
Storage and Make-Ahead Tips
Storing Your Tart:
- Keep covered loosely in the refrigerator for up to 2 days
- Don’t cover too tightly or the meringue might get sticky
- Best eaten the same day for crispiest meringue
- Meringue may weep (get watery) after day 2
Make-Ahead Strategies:
- Make and bake the crust up to 2 days ahead (store covered at room temperature)
- Make lemon filling 1 day ahead (cover surface with plastic wrap and refrigerate)
- Always make meringue fresh – it doesn’t store well unmade
- Assemble everything the day you plan to serve it
Freezing Tips:
- Freeze baked unfilled tart shell for up to 1 month
- DO NOT freeze the finished tart with meringue (it gets weird and watery)
- You can freeze just the lemon filling for up to 1 month
- Thaw frozen components in the fridge overnight
Keeping It Fresh:
- The meringue stays best in low humidity
- On humid days, add meringue right before serving
- Store at cool room temperature for 2-3 hours before refrigerating
- Leftover slices keep for 1-2 days in the fridge
Creative Recipe Variations
Want to try something different? Here are fun twists on lemon meringue tart:
Lime Meringue Tart: Replace lemons with limes for a tropical twist. Use the same measurements.
Meyer Lemon Tart: Use Meyer lemons (they’re sweeter) and reduce sugar in filling by 2 tablespoons.
Lemon-Raspberry Tart: Add ½ cup fresh raspberries to the lemon filling before adding meringue.
Orange Meringue Tart: Use orange juice and zest instead of lemon for a sweeter, milder flavor.
Chocolate Crust Version: Add 2 tablespoons cocoa powder to the tart crust for a chocolate-lemon combo.
Italian Meringue Upgrade: Make Italian meringue with hot sugar syrup – it’s more stable and glossier.
Individual Mini Tarts: Use a muffin tin to make 12 mini lemon meringue tarts (bake for 15 minutes).
No-Bake Lemon Tart: Use a graham cracker crust and skip the meringue, top with whipped cream instead.
Troubleshooting Common Problems
Meringue Weeping (Getting Watery)? This happens if the meringue isn’t sealed to the edges or if the filling wasn’t warm when you added it.
Crust Too Crumbly? Add a bit more water next time, or make sure you pressed it firmly into the pan.
Filling Too Runny? Cook it longer until it’s thick enough to coat the back of a spoon. It will thicken more as it cools.
Meringue Won’t Stiffen? Make sure no egg yolk got in the whites, and that your bowl is completely clean and dry.
Crust Soggy? Blind bake it longer until golden, and make sure it’s completely cool before adding filling.
Peaks Falling Flat? Beat the meringue longer until it forms stiff peaks that stand straight up.
Conclusion
Congratulations! Now you know how to make a stunning lemon meringue tart that looks like it came from a fancy bakery. This beautiful dessert proves that elegant doesn’t have to mean difficult. With three simple components – crispy crust, tangy filling, and fluffy meringue – you can create something that will wow everyone at your table.
Don’t worry if your first tart isn’t picture-perfect. Every baker has made a meringue that wept or a crust that crumbled. The important thing is that it will still taste absolutely delicious! Each time you make it, you’ll get better at those pretty peaks and that smooth filling.
Feel free to experiment with the variations I shared – try lime instead of lemon, add some berries, or make cute mini versions. The basic technique stays the same, so once you’ve mastered this recipe, you can create all sorts of citrusy masterpieces.
So grab those lemons, preheat your oven, and get ready to impress yourself (and everyone else) with your baking skills. There’s nothing quite like the pride you’ll feel when you slice into your homemade lemon meringue tart and see those perfect layers. Happy baking, and enjoy every tangy, sweet, cloud-like bite of your beautiful creation!
Did you love it ? Let us know!
There are no reviews yet. Be the first one to write one.